Turn still images or text into dynamic videos in any style, with leading AI models readily. Try the smart AI video generator now - stunning, free, and instant!
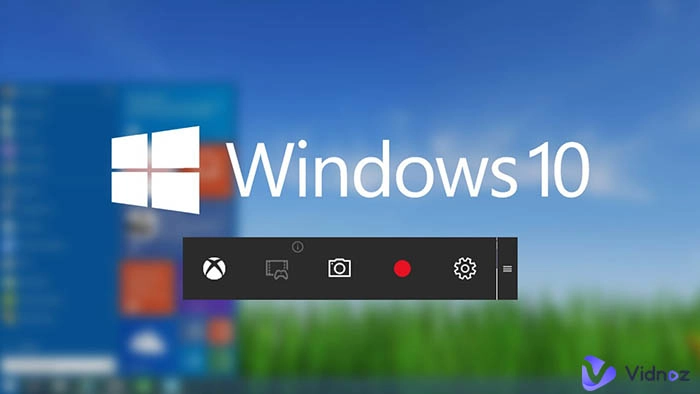
Best 4 Tools in 2026: How to Easily Record Screen on Windows 10 for Free?
Andrew Garcia
Updated on
SHARE THIS POST
Looking for ways to record screen on Windows 10? Then you have come to the right place. Get instant access to these 4 best tools in 2026 for free recording!
With the growing popularity of self-publishing, recording Windows 10 screens has become a common thing. People record screens for a variety of purposes, such as creating their own presentations, teaching online, or recording game highlights to post on YouTube. No matter what your purposes are, finding one reliable tool is the key to an attractive recording.
A good tool can make your creation twice as effective as the original one. If you are still confused by the numerous screen recording tools, don't worry, this article will provide you with the best Windows 10 screen recorder, and you can leave all your energy to your video creation!
On This Page
Record Windows 10 Screen with Vidnoz Flex: Free to Use
How to Record Windows 10 Screen with Vidnoz Flex?
Record Windows 10 Screen with VLC: Reliable to Record
How to Record the Screen on Windows 10 with VLC Media Player?
Record Windows 10 Screen with Xbox Game Bar: Professional for Games
How to Record Your Screen in Windows 10 with Xbox Game Bar?
Record Windows 10 Screen with the Snipping Tool: Easy to Record
How to Record Windows 10 Screen with Snipping Tool?
Conclusion
Record Windows 10 Screen with Vidnoz Flex: Free to Use
For dealing with easy Windows 10 screen recording tasks, you’re recommended to use Vidnoz Flex. As one flagship product of Vidnoz, Vidnoz Flex provides the best solutions on how to record screen on Windows 10. While providing the best services, Vidnoz Flex allows users to record webcam online without paying money. With Vidnoz Flex, you can freely record any actions on your screen Windows 10, and then output them as high-quality videos.
Vidnoz Flex - Inclusive Video Creation & Automation Platform
Create, customize, share, and track videos. Gain all faster with 2X speed!
Record, upload and edit videos with built-in video recorder editor.
Add CTA button, polls and user forms that enhance interaction.
Share your videos to mainstreaming platform in batches.
Track your video performance with in-depth insights.
Besides helping you deal with how to record Windows 10 screen, Vidnoz Flex is an all-in-one video processing tool for more tasks. After recording screens on Windows 10, you can edit the recordings with Vidnoz Flex’s editing tool. You can trim, cut or add images and interactive elements to the recordings. What’s more, Vidnoz Flex provides you with sharing function so you can share your recordings to other platforms.
Pros:
Record Screens Online Easily: Vidnoz Flex enables users to achieve effortless high-quality recordings and it can record every activity on your screen.
Free to Use: How to record Windows 10 screen for free? With Vidnoz Flex, you just need to sign up and log in, then you can start to record.
Various Recording Options: Vidnoz Flex provides 3 different modes of video recording. You can record a camera video or only record screen on Windows 10. Besides, you can also record videos with screen and camera together for making teaching or reaction videos.
Record with Teleprompter: Vidnoz Flex has a smart online teleprompter. It provides different script templates for you to use. With this teleprompter, you can speak on video fluently.
Editing Videos Supported: In addition to recording screens, Vidnoz Flex can help you edit your recordings. You can cut, trim, and add images or texts while editing.
Cons:
It is an online tool to record Windows 10 screen and can be affected by the network.
How to Record Windows 10 Screen with Vidnoz Flex?
Step 1. Visit Vidnoz Flex’s official website or click the button below to sign up and log into Vidnoz Flex. Then, you can enter the perfect studio that Vidnoz Flex has prepared for you!
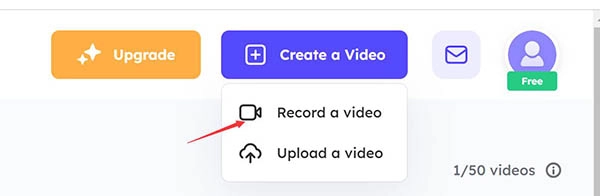
Step 2. Click Create a Video > Record a Video. Choose your preferred recording option. There are 3 modes for you to choose from. Click Start Recording.
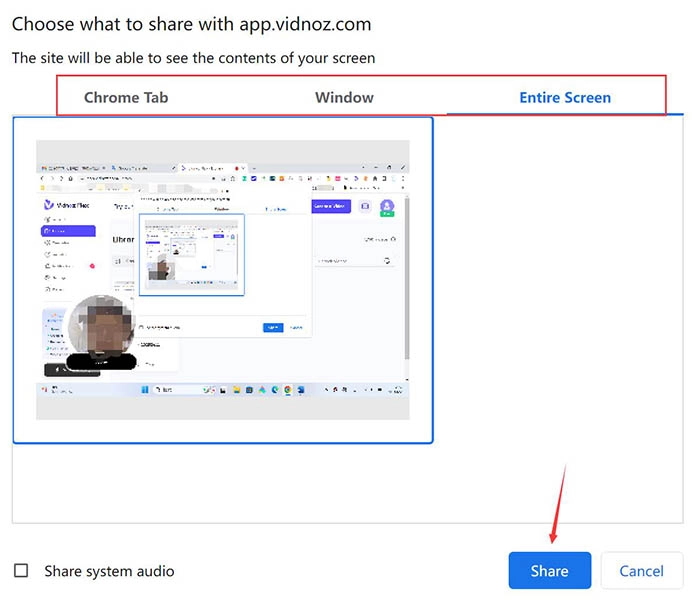
Step 3. Choose the screens or window that you want to record, and click Share to initiate the process. If you want to end the screen recording on Windows 10, click the red Finish button on the toolbar again.
Vidnoz has introduced AI tools to help users create content with more efficiency. You can convert text to speech to create AI voice-over for your recording and even make a video from a photo without recording with its Talking Head tool.
Record Windows 10 Screen with VLC: Reliable to Record
VLC is one of the best free media players that can play many different media files. Many people know this function of it and use it frequently in their daily life. However, there are some people who still don’t know that VLC media play has another function, recording screens Windows 10. With VLC media player, you can easily deal with how to record screen in Windows 10.
Pros:
Play All Formats. VLC media player can play all video formats. There is no impediment to video playback through VLC media player.
Record Screens Available. Through several steps, you can record the screens fast and free.
No Ads, No User Tracking. There are no ads or user tracking. 100% safe and private to use.
Cons:
The process of recording Windows 10 screen is complex.
You have to record the audio in advance, and then add the pre-recorded audio before recording.
How to Record the Screen on Windows 10 with VLC Media Player?
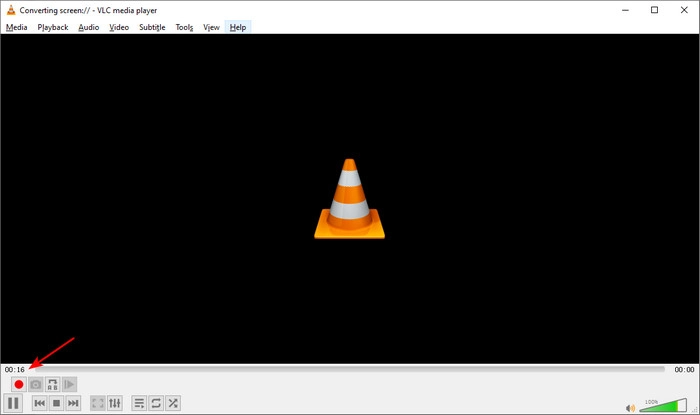
Step 1. Click View > Advanced Controls. A bottom toolbar will pop up.
Step 2. Click Media > Open Capture Device. On the Open Media dialogue, set the Capture mode as Desktop. You can also adjust the advanced settings based on your needs. Then head to the Play drop-down list and select Convert.
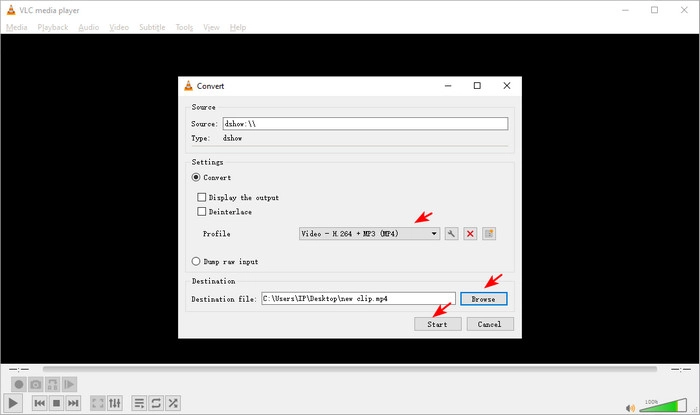
Step 3. On the Convert dialogue, Choose Video – H.264 + MP3 (MP4) next to the Profile option and select the destination folder. Click the Start button.
Step 4. You’ll see there will be a red button, which means it is recording your screen. Then click the Stop Playback button to end the recording.
Step 5. Find the recordings in the destination folder.
Record Windows 10 Screen with Xbox Game Bar: Professional for Games
Nowadays, there are many people who like recording screens while playing games. How to record your screen on Windows for capturing your gameplay highlights? Here comes Xbox Game Bar. Xbox Game Bar is a Microsoft application that contains various features that people need while recording game screens. Besides, Xbox Game Bar is free to use.
Pros:
Professional Recorders. Xbox Game Bar has a wide selection of gameplay recording features. You can use it to record games efficiently.
Shortcut Keys Supported. You can use shortcut keys to record with Xbox Game Bar, which will not affect your game scores.
Cons:
You are just permitted to record one window.
How to Record Your Screen in Windows 10 with Xbox Game Bar?
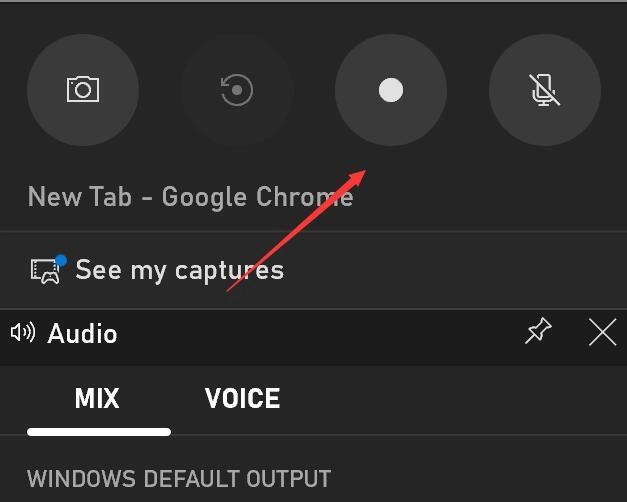
Step 1. Press Windows + G to open Xbox Game Bar.
Step 2. Click the circle button or press the Windows + Alt + R to start the recording.
Step 3. Click the blue button to stop recording, then click See my captures to check your recording.
Record Windows 10 Screen with the Snipping Tool: Easy to Record
If you have upgraded your system to Windows 11 and tried to capture screen video, Snipping Tool is a ready tool allowing you to record screen activities without installation. Like Xbox Game Bar, Snipping Tool is built-in software on your Windows PC. It provides you with recording features and you can use it to record some parts of your screen.
Windows 10 users can also use this tool to record Windows 10 screen yet you need to manually upgrade to the latest version on Microsoft Store. Because Snipping Tool out of the box on Windows 10 only supports screenshots currently.
Pros:
Easy to Use. Snipping Tool features a simple interface and a self-explanatory process.
Screenshot Available. The Snipping Tool can also be used to screenshot, you can click Windows + Shift + S to screenshot the screen.
Cons:
The Snipping Tool doesn’t support audio content recording.
How to Record Windows 10 Screen with Snipping Tool?
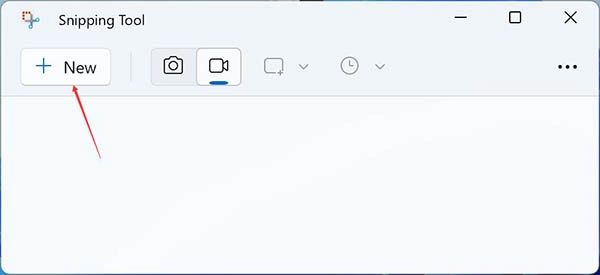
Step 1. Search Snipping Tool in the Windows search bar, then open it.
Step 2. Switch to Record mode. Click New, then select the area that you want to record on the screen.
Step 3. Click the Start button to record activity on your Windows PC and hit the red Stop button when you have captured the screen session as you have desired.
Step 4. On the Snipping Tool preview window, press Ctrl + S to end and save the recording file to your computer.
Conclusion
Recording screens is a common way to make video for communication and for marketing purposes. This article gives you different solutions on how to record Windows 10 screen. Each of them has special features. Among the choices, Vidnoz Flex provides you with full functions of recording screens. You can try it to record screens on your computer. Free and easy to use.
Facilitate Communication with Videos
Make communicate asynchronously and enhance team collaboration effectively.
Andrew Garcia is a writer who focuses on the field of technology. He is committed to producing high-quality articles to help users solve their problems. He is working hard to discover and introduce the latest AI tools so that users can experience the joys of emerging technologies. Hope his articles can give you some aid.